Once you’ve gotten the hang of the basics for moving off and stopping on the left, you’ll need to then move onto making left and right turns. This tutorial will explain the correct method for making a left turn, with diagrams as taught by driving instructors in an automatic car.
What You’ll Need to Learn When Making a Left Turn
This tutorial will make use of modern teaching standards by explaining how to make a left turn in an automatic car. When making a left turn, you’ll need to learn:
- To identify the left turn.
- To determine whether the junction is open or closed (what speed should you make a left turn).
- To anticipate and plan for the new road ahead.
- Look for potential and actual hazards.
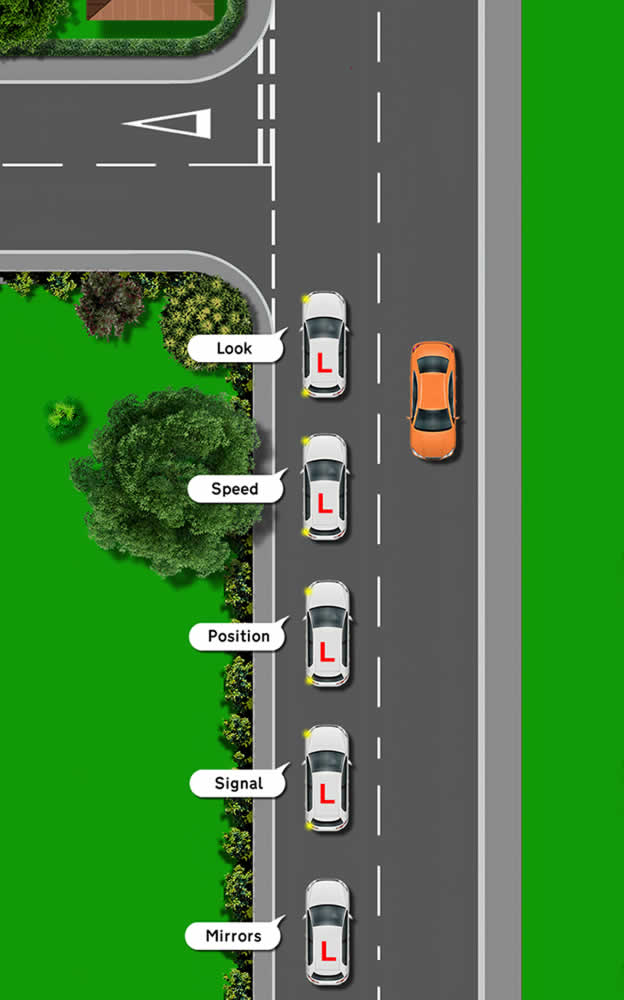
- To use the Mirrors, Signal, Position, Speed and Look (MSPSL) routine (detailed below).
Identifying the Left Turn
We’ve already covered how to identify a left turn. Identify the left turn as early as possible as this will give you more time to plan ahead. There may be road signs warning of a left turn, or you can scan the road ahead an visually identify the left turn.
Begin the MSPSL Driving Routine
We now begin the MSPSL driving routine. MSPSL stands for Mirrors, Signal, Position, Speed and Look. For making a left turn, use the following procedure::
Mirrors
Before changing direction or speed, you need to know that it’s safe to do so. You do this by checking your mirrors. Start off by checking your main internal mirror and because you’re taking a left turn, check the left door mirror.
Signal
For other road users and pedestrians, we need to signal our intentions. We do this by use of signals. Apply the left signal. For further information, see use of signals at a left turn.
Position
For the majority of left turns, you can simply remain in the centre of your lane just prior to making the turn. However, you need to assess the road that you’ll be turning into, before you turn into it. If it’s narrow, you may need to position your car to the right-side of your lane prior to making the turn. This will provide you with greater manoeuvrability of your car.
If you don’t position your car correction prior to the turn, you may end up hitting the kerb or crossing onto the wrong side of the road as you make the turn. Either of these issues is highly likely to fail the driving test. For an example of what we mean, see best road position for a left turn.
Speed
The speed at which you take a left turn varies for each and every turn because it all depends on what you can, or cannot see, plus the width of the road that you’ll be turning into. When approaching the left turn, assess whether the turn is open or closed. In general, open means that you can see into the left turn prior to taking it. If the left turn is open, it’s free from hazards and the road is reasonably wide, you can take the turn from between 10 to 15 mph.
If the left turn is closed, meaning that you can only see into the road as you turn into it and/or if the road is narrow, you’ll need to take the left turn at a much slower speed. Around 5 mph is likely a suitable speed for a hazardous turn as this will give you greater control of your car and allow you to stop sooner.
Look
As you slow down to take the left turn, you’ll need to cover the brake. This means that once you’ve reached the ideal speed for taking the turn (see how to brake smoothly in an automatic car), take the pressure off the brake pedal, but keep your foot resting on it, just in case you need to quickly use it.
Whilst covering the brake, you’ll need to take a final look around for hazards, just prior to taking the turn. This may include pedestrians crossing at junctions (be prepared to stop), or if you’re in a busy area, cyclists coming up on your left. If you think that there might be a cyclist, have a second look into your left mirror just before taking the turn and if you really want to be sure, take a look over your shoulder into your left blind spot.
If you’ve only just started out driving and are not entirely sure when to start turning the wheel for the left turn, you can use a reference point for left turns. It’s not an exact science, but reference points often help at the start of driving.
Keeping with the ‘look’ phase of the MSPSL routine, as you round the corner to turn left, you still need to keep looking out for hazards. You’ll often encounter parked cars, so you will need to be prepared to give way to oncoming cars if necessary. For further information, see hazards you’ll encounter at left turns.