After learning the correct technique for moving off in your automatic car, you’ll then need to learn how to safely stop. Before you begin the stopping on the left in an automatic car exercise, you should have knowledge on:
- Car controls
- Cockpit drill
- Observation and setting the mirrors
- How to park next to the kerb without hitting it (reference points)
- Moving off in an automatic car
This tutorial explains how to safely pull up on the left in an automatic car, using the same procedures taught by driving instructors. This stopping on the left tutorial is also applicable to electric cars, all of which are automatic.
You’ll be expected to stop on the left on more than one occasion during your practical driving test. By carrying out this procedure to the same standards as explained in this tutorial, the examiner will have no concerns on your ability to safely stop on the left.
Stopping on the Left in an Automatic Car
You’ve moved off, slowly driving in the centre of your lane and you now need to safely stop on the left-side of the road. The first thing you need to be aware of is where to stop.
Safe, Convenient and Legal Position
You need to locate a safe, convenient and legal position to stop the car. To help you remember, this is abbreviated to SCALP. In brief, this means that you need to stop in a
- Safe place, for example, not stopping opposite a junction
- Convenient place, in other words, not being inconvenient for others such as stopping across somebody’s driveway
- Legal place, such as not stopping on double yellow lines
Being as you’re just starting out learning to drive, you’ll not be expected have to deal with this, your supervising driver or instructor will guide you on where to stop. However, the SCALP driving routine is still something you need to be aware of and build on as you make progress. During the driving test, the examiner may ask you to stop in a specific place, equally however, they may leave the choice on where to stop up to you.
Mirror, Signal, Manoeuvre
Once you’ve located a safe, convenient and legal place to stop, you’ll need to become familiar with another driving routine that you’ll be using a lot, and this is mirror, signal and manoeuvre (MSM).
Mirrors
Start by checking your internal mirror and as you’re going to be stopping on the left, check also your left passenger mirror. When stopping on the left, checking the left blind spot isn’t compulsory, but it’s a good habit to get into, but particularly necessary if you’re in a busy area where cyclists may be riding alongside your car.
Signal
If there’s nobody around to see your left signal, then you don’t have to, but you can signal regardless if you wish. However, it’s important that you do signal your intention to stop on the left if there are any other road users or even pedestrians who may benefit from seeing your intentions.
Manoeuvre
It’s important to carry out the manoeuvre slowly. You need to be constantly looking at what’s going on around you, looking at reference point and to maintain good control of the car. You can only do this if the vehicle is kept to a slow speed. As your confidence and ability increases, you’ll then be able to increase you speed.
10 Steps for Stopping on the Left in an Automatic Car
Follow this 10 step tutorial for stopping on the left in an automatic car. This tutorial will enable you to stop on the left to driving test standard. The stopping on the left reference points are helpful to learner drivers who often lack spatial awareness when starting out. As you practice, you may find that you rely less on the reference points.
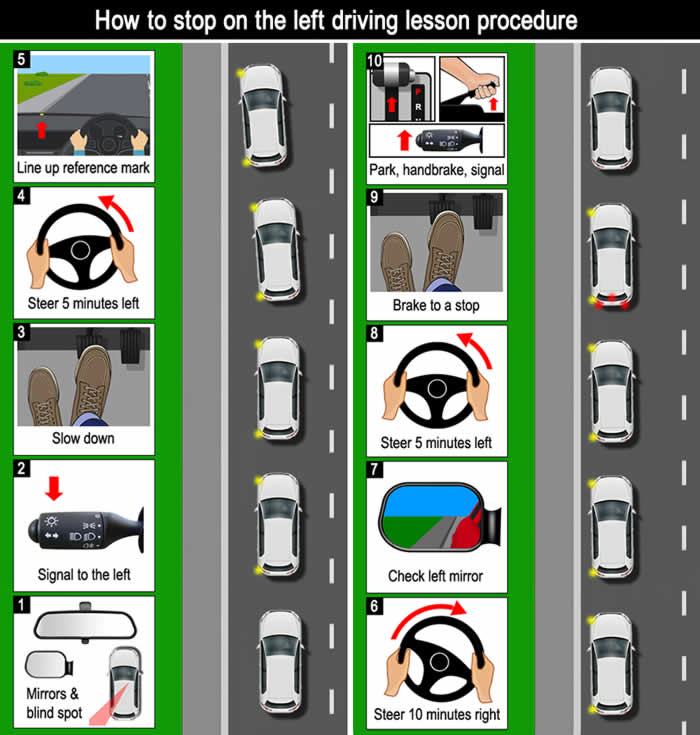
1. Mirrors, Signal and Blind Spot
Check the main internal mirror, followed by the left passenger mirror, then finally, look over your left shoulder into the blind spot. If it’s all clear, carry on to step 2.
2. Signal to the Left
Always apply a signal if you think somebody, even a pedestrian will benefit from knowing your intentions. If there’s nobody around, then you don’t have to signal if you don’t want to, or you can signal regardless, it’s up to you.
3. Slow Down
Being as you’re just starting out learning to drive, you’re going to be going slowly anyway, but we want it even slower. Remove your right foot from the accelerator pedal and rest it over the brake pedal, but don’t press it. This is called covering the brake. In order to have time to do everything properly, we need to keep the car very slow. Think of a slow walking pace.
4. Steer to Towards the Kerb
Now to steer towards the kerb. You need to ensure the angle in which your car approaches the kerb is shallow. If you steer too much and the angle is steep, you’re far more likely to hit the kerb. To give you a point of reference, think of the steering wheel as a clock and steer approximately 5 minutes to the left.
5. Line up the Reference Mark
As your car heads towards the kerb, we need to be looking for the reference mark to line up. This is where the kerb lines up with a reference mark on the dashboard. For help with understanding where the reference mark is, see how to park next to the kerb without hitting it.
6. Straighten up the Car
Once your reference mark has lines up with the kerb, you’ll need to straighten the car so that it’s parallel with the kerb. To do this, steer 10 minutes to the right, away from the kerb.
7. Check your Left Door Mirror
Your second point of reference is to check your left, passenger door mirror. Sit up straight so that you have the best view of the kerb in your left mirror. Check to ensure that the kerb is an appropriate distance from your car and that it’s parallel. So that you have an idea of what to look for, see how to park next to the kerb without hitting it.
8. Line up the Reference Mark
Once you’re happy that your car is parallel to the kerb and is an acceptable distance from the kerb, straighten the steering wheel. Steer 5 minutes to the left to straighten. You can tell that your steering wheel is straight by looking at it.
9. Brake to a Stop
We need to brake to a stop smoothly and progressively. Very gently apply pressure to the brake pedal using your right foot. Keep applying pressure until you feel the vehicle slowing. Continue to apply subtle pressure until the vehicle comes to a stop. Once the vehicle has stopped, apply firm pressure to the footbrake and leave your foot on the brake. To understand braking techniques, see how to brake smoothly in an automatic car.
10. Secure the Car
Once stopped, put the gear selector lever into Park (P), apply the handbrake or electronic parking brake and cancel your signal if you applied it. You can now remove your foot from the brake pedal and relax.
Tips for Private Practice
![]() If you’re giving a learner driver private practice, read up on our tips for stopping on the left.
If you’re giving a learner driver private practice, read up on our tips for stopping on the left.