Automatic Car Cockpit Drill
Here you can learn how to do the cockpit drill for automatic cars. More of us are choosing to learn to drive automatic cars for a reason; they’re much easier to drive. When learning to drive, the very first lesson you’ll start out with is going to be the car cockpit drill. The automatic car cockpit drill is slightly easier to learn because we don’t have a clutch pedal.
- Car Cockpit Drill Explained
- Will I Drive the Car After the Cockpit Drill?
- Automatic Car Cockpit Drill Tutorial
Car Cockpit Drill Explained
The instructor’s cockpit drill is a sequence of checks and adjustments that must be completed each time you enter the car. Due to the car being previously driven by the instructor, you’ll need to ensure you can reach all the controls and cover certain safety checks.
The cockpit drill driving lesson tutorial is where you’ll begin the learning to drive process and will be covered in the first lesson with your instructor. The cockpit drill will take around 2 hours to complete with your instructor, but after this first lesson, it’ll only take you about 2 minutes to complete at the start of each lesson.
By reading this cockpit drill tutorial, you’ll familiarise yourself with the procedure and perhaps save some time on your lesson.
Will I Drive the Car After the Cockpit Drill?
If you’re taking driving lessons with an DVSA Approved Driving Instructor (ADI), after you’ve completed the cockpit drill lesson, the instructor usually leaves enough time for you to have a drive in the car. As this is likely to be your first time driving, this short drive usually involves moving off from the side of the road and pulling up on the left a little further up the road.
Automatic Car Cockpit Drill Tutorial
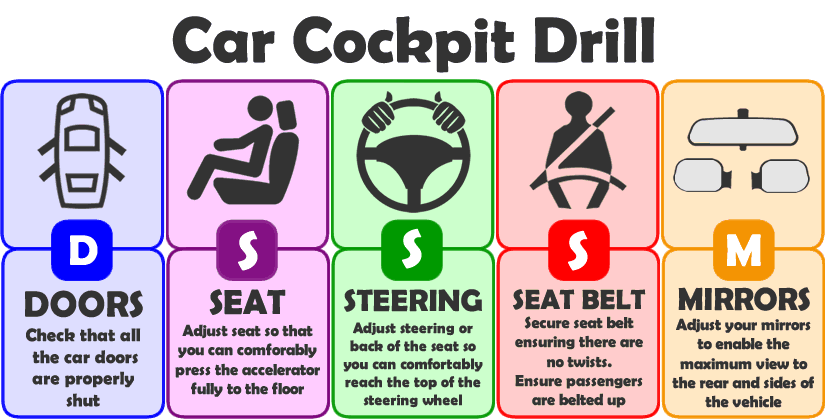
Now we’ll begin the cockpit drill tutorial for automatic cars. In this lesson, we’ll be using the abbreviation ‘DSSSM‘. Most fully qualified instructors use this technique, so you’ll be familiar with it on your cockpit drill lesson. DSSSM stands for Doors, Seat, Steering, Seat Belts and Mirrors. Always ensure the engine is switched off before attempting the cockpit drill.
Doors
Make sure your door is properly closed. When seated, give the door handle a tug. If there’s movement in the door, you’ll need to open it and shut it again. Before opening the door, check the road is clear by checking in the right side mirror and over your right shoulder. If any of the doors are not properly shut, you’ll see a red warning light on the dashboard, but this will only become visible when the key is in the ignition and the ignition is switched on.
Seat
You’ll need to adjust your seat so that you have a clear view of the road ahead and that you can comfortably reach all the vehicle controls.

- Seat height: If you’re quite small in size, you may benefit from raising the height of the seat. Avoid raising it too high that your legs are touching the steering wheel. Not all cars have this option.
- Foot controls: Use your right foot and press the accelerator pedal (pedal on the right) to the floor. You should be able to do this while maintaining a slight bend in the leg. Pull the seat forward or move backwards until you find the correct position.
- Headrest: The headrest helps to reduce neck injury during a collision. Raise or lower the headrest until the top of your ear lines up with the centre of the headrest.
Steering
You’ll now need to adust the seat so that you can comfortably operate the steering wheel.
- Steering: Place your hands at the top of the steering wheel as this is the part angled furthest away from you. Adjust the back-rest part of the seat so that you are maintaining a slight bend in your arm, while gripping the very top of the steering wheel. When adjusting the steering wheel, ensure that you can see all the dials – else you may end up speeding!
Seat Belts
By law you must wear a seat belt unless you have an exemption certificate. However, you can legally remove your seat belt while reversing. It’s the driver’s responsibility that children under 14 have their seat belt fastened.
Mirrors
The final adjustment of the cockpit drill is the mirrors.
- Internal mirror: While adjusting mirrors, try to avoid learning forward, as the view in the mirrors will be different when you sit back into your seat again. Remain in your normal driving position and using your fingers around the edge of the mirror (this avoids leaving finger prints on the glass), adjust the mirror so you can see as much out of the rear window and as little of the car interior as possible.
- Side mirrors: Adjust the side mirrors so that you can see an equal amount of sky and road and just a small amount of the side of your car.
Thanks well explained
This is awesome! thanks heaps mate!
No problem 🙂
this drill is so fertile more especially for me as an organization transport manager.