As a learner driver, spatial awareness and your ability to understand where your car is in relation to the road can be a challenge. One such difficulty is understanding where the kerb is when parking next to it. You need to avoid parking too far away from the kerb, but close enough while also avoiding hitting it.
There’s no precise strategy to this, so instead we use reference points. Driving instructors use reference points to varying degrees. We find that the more you use, the easier it is to learn. Reference points can be used at many stages of learning to drive and parking next to a kerb is an ideal exercise where we can start using them.
How to Park Next to a Kerb Without Hitting It
This tutorial is going to explain how to park next to a kerb on your left, using reference points. When parking up, many learner drivers have a tendency to scrape the kerb or even hit it with force. Some learners even end up mounting the pavement, so in order to park up next to a kerb without hitting it, you need to begin the exercise very slowly, think a slow walking pace.
We’re going to use two points of reference to help you park, so in order to visualise these reference points, you first need to park close to the kerb (30cm or less) and to ensure that the car is level and parallel with the kerb. You can ask your supervising passenger to assist with this. Once parked up, sit in your normal driving position and look at the kerbline ahead.
The first reference point is where we see the kerbline coming down the road (highlighted in red) towards the car. It then stops at a point where the car’s dashboard begins. It’s at this point where the kerb stops and the dashboard begins is where we place our first reference marker. You can if you wish place a small sticker (highlighted in yellow) at this point.
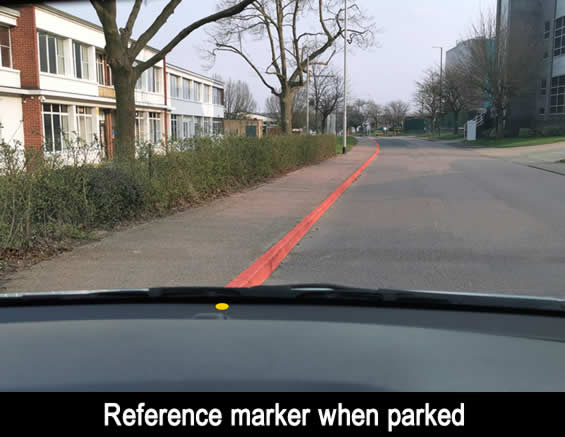
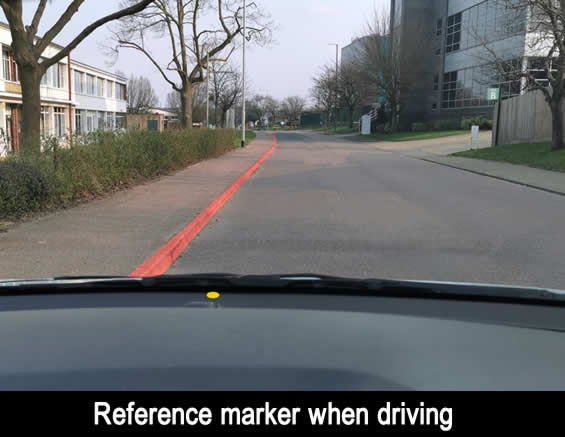
As you can see from the image below, when driving, you’re further away from the kerb, therefore the kerb and the marker are not aligned. When you intend on parking next to the kerb, carry out the mirror, signal manoeuvre (MSM) routine, gently slow the car to a walking pace and steer to the left until the yellow marker lines up with the kerb.
As you begin to slowly move closer to the kerb, the second point of reference can be seen in your left passenger door mirror. It’s a good idea to angle your passenger door mirror so that it’s low enough to see the kerb, but so that you can still see down the road clearly. Sitting up straight will also give you a better view of the kerb. When you’re parked up close to the kerb at the start of the exercise, take a good look into your left passenger mirror.
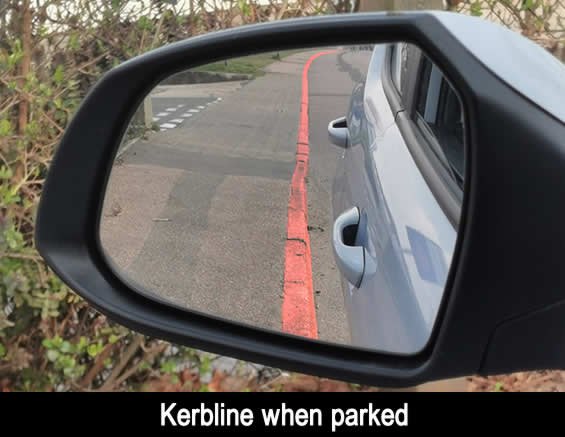
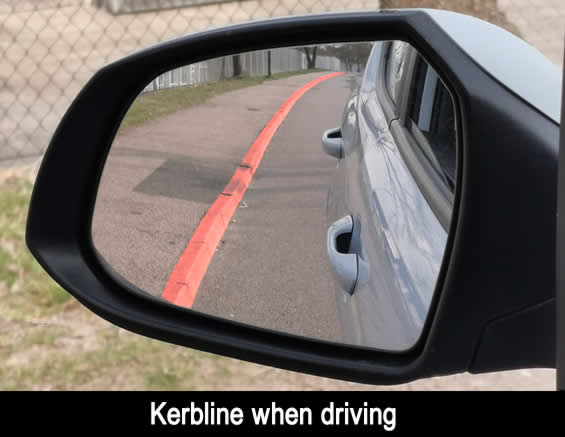
Again, we’ve highlighted the kerb in red and you can see that the car is parked close and parallel to the kerb. The view in your left, passenger door mirror should look very similar to this. When driving, the kerb will be further away from your car and will look something similar to the image below.
How to Park Next to a Kerb Without Hitting It Key Points
When learning to park next to a kerb, it takes time practice and patience. Even some experienced drivers struggle with it, often banging into kerbs or scraping wheels. They key points when learning how to park next to a kerb are:
Speed
Keep your car as slow as possible when moving towards the kerb. Think of a slow walking pace. It’s much easier to learn when the vehicle is slow. As you improve, you’ll be able to park more confidently and at a faster rate.
Steering
When steering towards the kerb, do so in small increments. If your car moves towards the kerb at too much of a steep angle, you’re far more likely to hit it.
Points of Reference
When heading over towards the kerb, use the windscreen reference point marker initially and as you get closer to the kerb, alternate between the windscreen marker and the left passenger door mirror. Combining both points of reference will ensure you park perfectly.
All-round Observation
When learning to park on the left next to the kerb, it’s important to know what’s going on around you. Combine looking at your reference points with general all-round observation. You can only do this if you keep the car very slow.
How Close to the Kerb Should You Park?
You should aim to park 30cm or less from the kerb. You can park as close to the kerb as you like, provided that you don’t hit it, but if you park too far away from it, you may attract a fault during your driving test.
What Happens if you Hit the Kerb When Parking During a Driving Test?
It depends as it’s down to specific situations and the opinions of each examiner. If you scrape the kerb, it’s likely nothing will happen other than you having a scratched wheel. If you hit the kerb, but not too heavily, you’ll likely receive a minor fault, but if you hit the kerb with a degree of force or actually mount the pavement, you’ll likely receive a serious or dangerous fault.
What Happens if you Park Too Far From the Kerb During a Driving Test?
If you have parked your car and then realise you’re quite some distance away from the kerb, the best thing to do is tell the examiner that you’re too far away from the kerb and that you’re going to correct it.
If you’ve parked some distance from the kerb and are unaware of it or if you fail to take remedial action, the examiner is likely to ask you to park up many more times throughout the test. This is to check on whether it was a one off incident, or whether there’s a consistent problem with your ability to park. If it’s consistent and your distance from the kerb is considered hazardous to other road users, you’ll fail the driving test.