Once you have become familiar with the MSPSL driving routine, you’ll then need to move onto the LADA routine. This is because the LADA routine continues where the MSPSL routine ends.
What Does LADA Stand for in Driving?
LADA stands for Look, Assess, Decide and Act and extends on the MSPSL routine. Where the MSPSL routine (Mirror, Signal, Position, Speed, Look) ends with ‘Look’, the LADA routine begins, so it’s essentially MSPSLADA. It seems like a lot to take in, but when you continuously repeat the routine from the early stages of learning to drive, you’ll soon get the hang of it.
Why is the LADA Driving Routine Important?
As a new, learner driver, it’s easy to forget things and if you forget something at a critical moment, it’s not only potentially dangerous, but it may result in a test failure.
The LADA routine represents an area where most driving tests are failed; the critical moment between looking at a situation and having to quickly decide on whether to act or not. A key area here is junctions where the test candidate must look, assess, decide and act on whether to emerge out of a junction, or wait. Lack of effective observation and/or not correctly acting on what you see at a junction is the top reason for test failures each and every year.
When Do I Use the LADA Routine?
You need to apply the LADA driving routine each time before a:
- Change of direction
- Change of speed
For example, you should apply the LADA routine just before:
- Emerging from a T-junction / crossroads
- Entering a roundabout
- Making a left or right turn
- Changing lanes
- Dealing with a hazard / potential hazard
- Overtaking
How do you do the LADA Routine?
Many driving tests are failed at the point where the LADA driving routine is being carried. This is because you need to Look, Assess, Decide and Act in an appropriate time.
Too slow, you’ll miss various opportunities to move away and will become too hesitant and to quickly, you risk failing to make effective observations and risk becoming a danger to other road users. As an example, we’re going to follow on from the MSPSL routine where we are turning right at a T-junction.
Look
In terms of ‘look’, you need to do this at the earliest opportunity to determine the type of junction that you’re approaching. Is it an ‘open’ junction (nothing to hinder your view of the junction), or a ‘closed’ junction (trees, fences that obscure your view of the junction). This determines the speed at which you approach the junction.
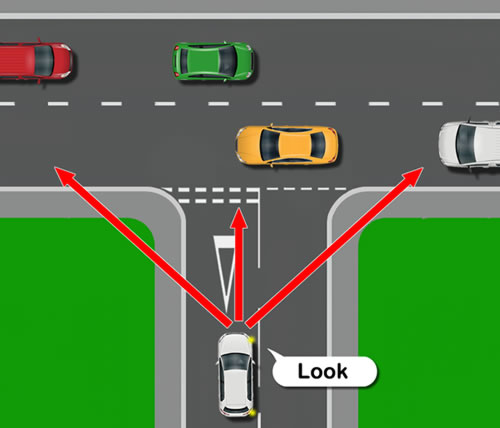
As you approach the junction, you need to look:
- Ahead
- To the left and right
Continuously alternate your observations from ahead, so that you can keep an eye on the junction line and where to stop (if necessary) and also scanning the road ahead to the left and right so that you can determine whether you need to stop at the junction line or continue without needing to stop.
Assess
There’s a lot to do at a junction and assess what’s going on can be difficult for inexperienced drivers. When approaching the junction, you need to assess:
- How fast the traffic is moving
- How busy the road is
- Whether there are any gaps in the traffic that will coincide with you arriving at the junction line
- Other hazards
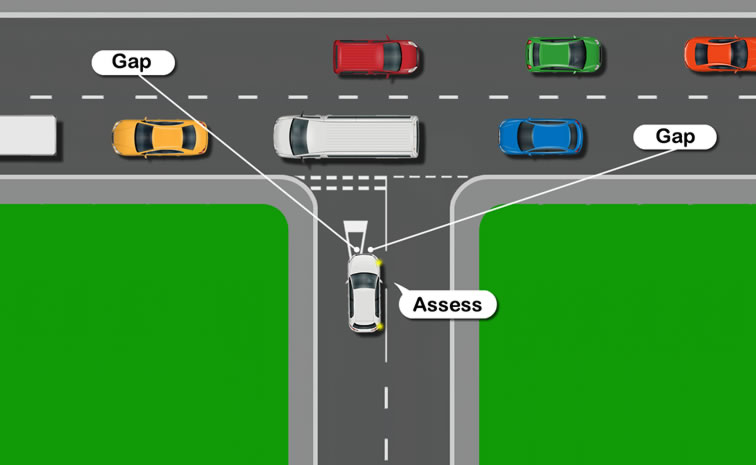
On the approach to the junction, look for any speed limit signs that may indicate the speed of the traffic on the road ahead. If there are no speed limit signs, it’s likely the road is the same speed as the one that you’re on. Faster moving traffic means you’ll need to allow for larger gaps in the traffic. If the road is busy, assess the traffic from left to right, looking for gaps that will allow you to merge from the junction.
Don’t forget to assess the area for other hazards such as cyclists. It’s easy to focus on cars and to ‘not see’ cycles. Cyclists can also momentarily be obscured in blind spots, such as the pillars on either side of the windscreen. Junctions can be very busy places and are also areas that pedestrians cross the road. You should be aware of pedestrians that are waiting to cross and how your vehicle may interact with their actions.
Decide
You’ve looked at the junction and assessed it. Now it’s time to decide on what you’re going to do. Your decision is based on your speed of approach due to you looking at the type of junction and what you can or cannot see and then assessing the situation.
When turning right at a junction, it might help to think of yourself as a pedestrian crossing the road at a walking pace. If you wouldn’t feel safe crossing as a pedestrian, then it’s not safe to turn right in a car.
Decide: is it safe to pull out? Is there time to pull out?
Act
The decision has been made and you now need to safely, but swiftly act. The choices are either to go:
- Go – Move off safely, under control and without hesitation.
- Stop – in the correct position just behind the junction line and continue to look, assess and decide.
Ultimately, if you’re unsure, then stop. Always choose caution over risk. The examiner does want to see progress made, but certainly not at the expense of taking risks.